Navigation Menu

sewing furniture DIY decor num nums mi vida loca

Thursday, March 29, 2012

'Fashionista' T-Shirt Dress.


  This was not made from a pattern...but from me and my dear friend Bobbins brain, trial and error, peanut butter oatmeal white chocolate cookies and these items: (recipe below)
  • 1. T-shirt from Target.
  • 2. Shiny fabric cut into 3 strips; small, med, large. (I had to add an additional strip to Roo's for length)
  • 3. Black and white ribbon sewn over the top strip seam to form a belt/band. 
 The process in making this dress was not very 'clean' we totally made it up as we went. But here a few tips in case you want to try it for yourself. I measured the width of the shirt to know how long my strips needed to be to sew them to the shirt. I add 4 inches in length to the first strip to gather and add a little wave, 6 inches to the second strip, 8 inches to the bottom strip. NOTE! The fabric, although shiny and pretty, doesn't stretch! My friend is going to have to add a zipper to her daughters dress because she can't get it over her shoulders. I would use something with stretch next time. For Quinn's dress I simply sewed each strip on to the actually t-shirt. My friend made a little slip and sewed her strips to that first then sewed the slip/skirt to the t-shirt.

Cookie Recipe:
(copy and paste the link below into your address bar)
http://www.loveveggiesandyoga.com/2011/10/peanut-butter-oatmeal-white-chocolate-cookies.html


Friday, March 23, 2012

Roo and Hoo

What do these two have in common?

  1. They are both undeniably freakin' cute.
  2. I carry their squishy butts all around God's green Earth.
  3. They can be seen regularly at Target with popcorn in them.

This awesome tote totally inspired me. As soon as I saw it I wanted to make a bag with poor ladies leather, pleather. Never used it before so I am going to play and play, but once I make something post worthy I will share. Unfortunately, I will not be able to share how to make the adorable 'Roo'...ahem.


Thursday, March 22, 2012

'Rock-a-Bye' pattern.

NEW!!
'ROCK-A-BYE' Quilt.
 Double Pattern-yes you get both hooters!
(I still need to add the binding to the girl quilt. I got too excited to share)
I will be sending out the first shipment of this pattern the beginning of next week. So it should hit the quilt shops very soon. BUT, I am going to be giving away a few FREE patterns! Comment on this post and your name will go into the drawing. AND...if you have a friend that becomes a follower of my blog due to your awesomeness, they can comment and add their name and yours again to up your chances. I know it's not much, but I totally intend on getting better stuff to give away as my lil' bloggy grows.


 The following pics are close ups so you can get some ideas as to how you would like the quilting done.
 I have the BEST long-arm quilter in these here parts...my Mom...she likes to turn on her oldies and dance with her machine and the results are always awesome. Thanks mama!


Sweet Tat.


 'Stitch in the Ditch' for the borders.

NOTE: Fabric used for both quilts are from 'Riley Blake Designs'. An AWESOME fabric company based out of Utah. Love their designs. BOY OWL: "Mod Tod" line. GIRL OWL: "Daisy Cottage" line.

Friday, March 9, 2012

Happy St. Patty's Day toe Ya!!

DIY 4-leaf clover pennant.
Light Heat-N-Bond Adhesive Transfer Paper, green felt, burlap, cotton stuffn'.
Burlap is kinda tricky to work with. I just cut rectangles at about 6x8. Then turned the top (shorter length) over about a 1/2 inch to form the 'tunnel' for you twine to thread through for hanging. Do all of those first. Then eyeball the triangle cut. (examine pic). Doing this first will help you to center your clovers better.  After you have traced clovers to Heat and Bond Adhesive Transfer Paper, cut them into squares and iron down to the wrong side of felt. THEN you cut them out on the line. Peel off paper and put a lil' stuffn' in the center and iron down. I had to press the edges down for a bit while the felt cooled to help it hold. 
Casing for twine to thread through (this is the underside).
I used a simple straight stitch with a thread that had a hue of turquoise. I can't resist using that color any chance i get!
Viola'! Clear as Mud?
This lovely little decor is hanging in my dear friend Bobbins house. We just taped it to her mantle.
We LOVE our 'plump' little clovers. Grab a box of Lucky Charms and head over to your BF's house and whip this up one afternoon for the holidays.

Wednesday, March 7, 2012

Easy Chandelier

 Tah-Dah!! 
My new sewing room light that is nice and bright.

Bought light for $25. Used 1.5 cans of "Candy Pink" RUST-OLEUM spray paint. Personal opinion, Krylon from Micheals is terrible, no bueno. I kept the old bulbs in to protect the wiring stuff inside.
Nice bright light!

The bulbs where totally affordable and bought at Home Depot. The center one has almost a gem shape. Perfect! Found the beads at Micheal's. Dug around the house and grabbed my hubby's tackle box. "Borrowed" some hooks and fishing line. Measure with the line or beads to visualize how much you want it to hang down. I cut extra to make it easier to tie. The white beads I didn't re-string, just tied it up to the existing pink beads. Hook it anywhere and let the gems bling bling away!

Loverly.


Saturday, March 3, 2012

Well 'Ello' Walta!

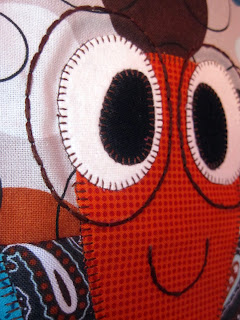
 Meet Walter. He is from my 'BuggySue & Walter"pattern. My biggest seller. Very easy pattern that is perfect for those wanting to venture into machine applique. It also comes with a lady bug so it's a double pattern. More bang for yer buck! Link to buy this pattern and all my other patterns is coming soon. (should I say pattern one more time?) I am making this for a nephew that was born months ago...yeek! I plan to use minky on the back and bind it with a brown stripe.

Close up of my stitching. I use a blanket stitch on all the pieces and for 'lines', like his glasses and smile, I use a stitch that goes forward then back to make it thicker. If you don't have that fancy shmancy stitch, you could; go over it a few times with a regular straight stitch, use thicker thread, or hand embroidery it.

Friday, March 2, 2012

Gettin' Crafty - preview

 Hoping to add a little 'comfort' to my living room wall. (sneak peak...the S)

My sewing room has terrible lighting! I hope to remedy that with this little beauty. (I already threw out the taupe frosted glass around the bulbs...blug)